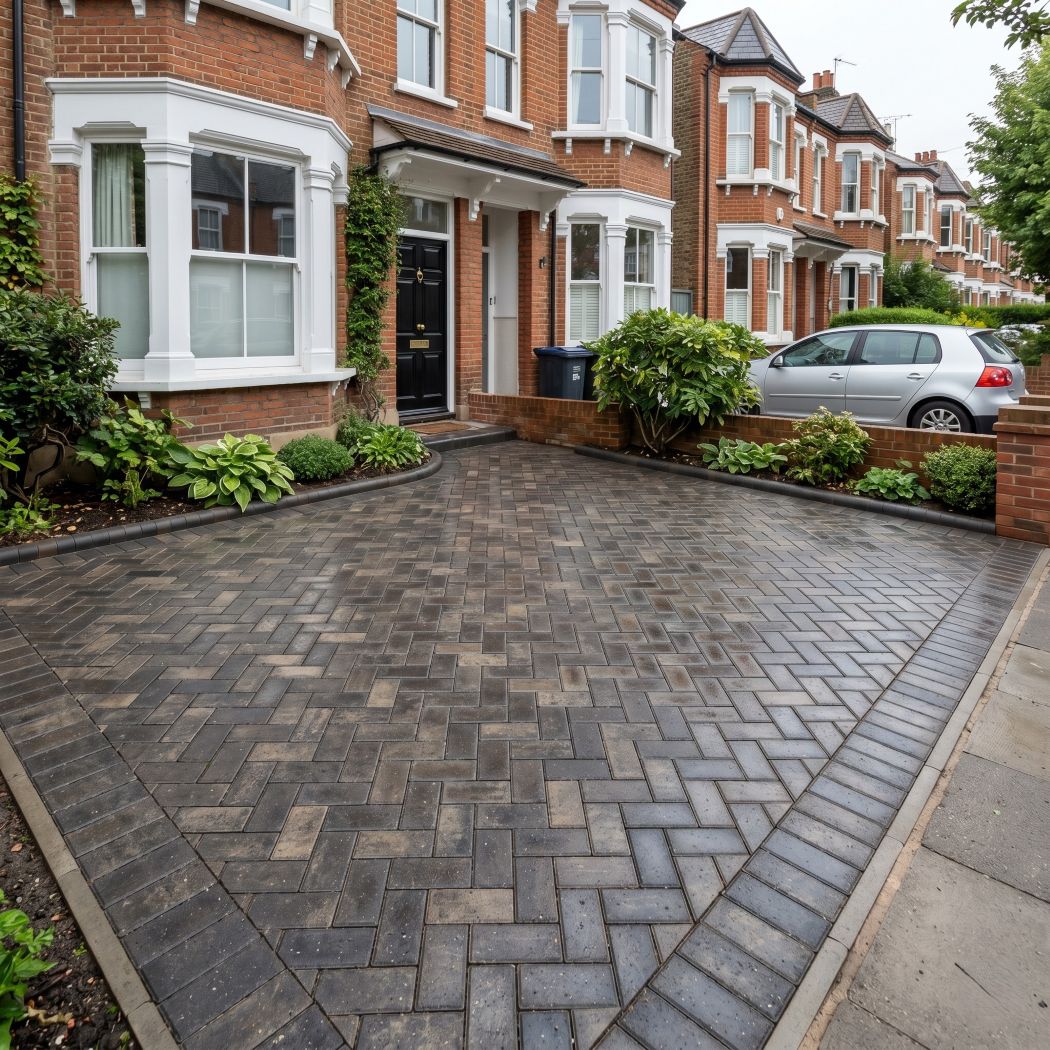
There is no more satisfying job in the garden than pressure washing a block paving driveway. The dirt lifts in a dark wave, the original colour of the blocks comes flooding back, and a tired grey driveway turns crisp and clean in an afternoon. The problem is what you cannot see happening at the same time. With every pass of the lance, fine sand is being driven out of the joints between the blocks and washed away down the drive in that satisfying dark wave. That sand is not dirt. It is the one thing holding the whole driveway together, and once it is gone the blocks begin to loosen, rock, tilt and let weeds back in within a season or two. Most people only realise what they have done weeks later, when the first block wobbles underfoot. The good news is that you can clean block paving properly and keep the sand exactly where it belongs – it just takes a little understanding of how the surface is built and a different approach to the lance.
Why Does the Sand Between Block Paving Matter So Much?
The sand between the blocks matters because it is structural, not cosmetic. A block paving driveway is not a solid slab; it is hundreds of individual blocks held in position entirely by the material packed into the gaps between them, and remove that material and the system stops working.
The Jointing Sand Is What Holds Everything Together
Block paving works on a principle called interlock, and the jointing sand is what creates it. Under the blocks sits a compacted stone sub-base, usually MOT Type 1, then a laying course of sharp sand around 30 to 50 millimetres deep that the blocks are bedded into. The blocks themselves are laid tight, with joints of only two to five millimetres, and those joints are filled with fine kiln-dried sand brushed across the surface. That sand wedges between every block and locks them against one another, so that when a car wheel presses on one block the load spreads sideways through the sand into all its neighbours rather than pushing that single block down. The whole driveway behaves as one flexible surface precisely because of the sand in the joints. It is doing a real engineering job, quietly, under every tyre that crosses it.
What Happens When the Sand Is Gone
Once the jointing sand is washed out, the interlock fails and the damage compounds quickly. With nothing wedging them together, individual blocks start to move under load, rocking and tilting and dropping below the level of their neighbours. The open joints let rainwater run straight down into the laying course beneath, softening it and accelerating the sinking, and in winter that trapped water freezes and shifts the blocks further. Weed seeds and moss colonise the empty gaps almost immediately, because there is now bare damp sand for them to root into. What began as a clean driveway becomes an uneven, weed-streaked one within a couple of seasons, and re-levelling sunken blocks is a far bigger job than the wash that caused it.
Why Does Pressure Washing Wash the Sand Out?
Pressure washing washes the sand out because kiln-dried jointing sand is fine, loose and far weaker than the jet hitting it. A pressure washer aimed straight into a two-millimetre joint is effectively a tool for excavating sand, and most of the technique that makes the surface look impressive is the same technique that empties the joints.
The Settings and Technique That Cause the Damage
The way most people hold and move the lance is what does the harm. A narrow pencil jet or a turbo nozzle concentrates enormous force into a tiny point, and dragged slowly along a joint it scours the sand out completely, often right down to the laying course. Holding the nozzle close to the surface multiplies the effect, as does lingering in one spot to shift a stubborn mark. Pointing the jet directly down into the joints, rather than across the blocks, sends the water straight where the sand lives. None of this is necessary to get the surface clean. The dirt sitting on top of the blocks lifts at far gentler settings than the sand needs to be blown out, which means there is a real working window between cleaning the blocks and stripping the joints – if you know how to stay inside it.
How Do You Pressure Wash Block Paving Without Wrecking It?
You pressure wash block paving safely by using a wider nozzle, keeping your distance, working across the blocks rather than into the joints, and never lingering in one place. The aim is to clean the faces of the blocks while leaving as much jointing sand undisturbed as possible, accepting that you will always lose a little and will top it up afterwards.
Prep – Weeds, Moss and a Dry Forecast
Good preparation does most of the work and reduces how aggressive you need to be. Treat any weeds and moss with a suitable weedkiller or path biocide a week or two beforehand and let it kill the growth fully, so you are washing away dead material rather than blasting at living roots wedged in the joints. Sweep the whole drive first to clear loose grit and debris. Just as important, check the forecast: you want a dry spell, because the re-sanding afterwards only works on bone-dry paving, and that is far easier to achieve after several rain-free days.
The Right Pressure, Nozzle and Angle
Nozzle choice and angle matter more than raw power on block paving. Use a wide fan nozzle of around 25 degrees rather than a pencil jet or turbo head, keep the tip a good 20 to 30 centimetres back from the surface, and hold the lance at a shallow angle so the water sweeps across the blocks rather than driving down into the gaps. Keep the nozzle moving in steady, overlapping passes and never pause on one spot. Working in the direction of the joints, rather than straight at right angles into them, helps the sand stay put. A domestic machine of 1500 to 2000 PSI is ample for cleaning the block faces, and there is nothing to gain from a more powerful jet except faster sand loss.
Consider a Rotary Surface Cleaner
A rotary surface cleaner is the single best attachment for protecting the joints. This is a flat circular head that encloses two spinning jets behind a skirt, and because it holds the spray at a fixed height and angle and keeps it constantly moving, it cleans the block faces evenly while putting far less direct force into any individual joint than a hand-held lance ever does. It also removes the temptation to linger or to point the jet downward. The finish is more uniform, with none of the zebra striping that hand washing leaves, and the sand loss is dramatically lower.
How Do You Re-sand Block Paving After Washing?
You re-sand block paving by brushing fresh kiln-dried sand into the joints once the surface is completely dry, then compacting it and topping up. This step is not optional. Even careful washing removes some sand, and replacing it is what restores the interlock and protects all the work you have just done.
Kiln-Dried Sand and the Drying Trap
The most common re-sanding mistake is doing it too soon, while the paving is still damp. Kiln-dried sand is dry for a reason: it is fine enough to flow down into narrow joints and pack tight, and it only does that when both the sand and the joints are dry. Brush it across damp paving and it clumps on the surface, bridges the top of the joint and never reaches the bottom, leaving the joint half empty under a deceptive cap. Wait until the drive has had a few dry days, then pour the sand out and sweep it diagonally across the blocks with a stiff broom, working it into every joint. Tamp it down or, ideally, run a plate compactor with a rubber mat over the surface to vibrate the sand home, then sweep more in and repeat until the joints are full to just below the chamfer. Brush off the excess before any rain.
Should You Seal Block Paving Afterwards?
Sealing block paving after cleaning and re-sanding is worthwhile, mainly because the right sealer locks the jointing sand in place. A joint-stabilising block paving sealer binds the surface of the sand into a firm crust, so it resists being washed out by rain or blown out next time you clean, and it also inhibits weed growth and slows the white efflorescence bloom that concrete blocks often throw up. The paving must be completely clean, dry and freshly sanded before sealing, and the weather dry for a good while afterwards. Sealers wear and need reapplying every few years rather than lasting forever. It is genuinely optional – an unsealed drive that is re-sanded properly will be perfectly sound – but on a driveway you have just spent an afternoon restoring, sealing is what makes the result last.
A Word on London Driveways and Permeable Paving
London has paved over more front gardens for off-street parking than anywhere in the country, and two local quirks are worth knowing. First, much of the capital sits on London clay, which swells and shrinks with the seasons and makes block paving more prone to movement, so keeping the joints full and the surface sealed matters even more here than elsewhere. Second, since planning rules changed in 2008, larger areas of new impermeable paving that drain to the road can require planning permission in England, which has pushed many newer London driveways towards permeable block paving. Permeable systems are built differently, using a clean angular grit in wider joints to let water soak through rather than fine kiln-dried sand, and they must never be washed out or sealed in the same way, because that destroys the drainage they exist to provide. If your driveway is a recent permeable installation, the entire approach above changes, and it is worth confirming what you have before you start.